Wrought Iron Circle Trivet Wall Plaque Free Pattern
Click the banners below for more popular patterns, available via download!


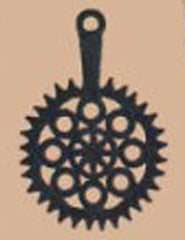
Wrought Iron Circle Trivet Wall Plaque
FP296
Easy Skill
Sizes: 6 inches wide, 8 ¾ inches long
Materials:Lily Double Quick:
Black - 2 skeins.
1 inch Plastic Rings - 9
Crochet Hook:Steel size 3 (2.10 mm).
Abbreviations
|
beg |
beginning |
rnd |
round |
|
ch |
chain |
sc |
single crochet(s) |
|
dc |
double crochet |
sl st(s) |
slip stitch(es) |
|
lp(s) |
loop(s) |
sp(s) |
space(s) |
|
rem |
remaining |
st(s) |
stitch(es) |
|
rep |
repeat |
yo |
yarn over |
Starching Instructions: Dissolve 2 heaped tbs Argo Gloss Starch in ½ cup cold water. Add to 1 quart warm water. Heat and boil briskly for a few minutes, stirring constantly. Add 2 cups cold water and cool. Dip crochet pieces in starch, squeezing the starch through it. Remove and squeeze out excess starch. Roll in paper towels and leave for an hour or two. Then rub off any excess starch with paper towel. Stretch and block piece as instructed.
Center (Make 2)
Rnd 1:(Right Side) Starting at center, ch 2, 8 sc in 2nd ch from hook; join with sl st to first sc.
Rnd 2:Ch 5, tr in same st, * ch 4, keeping last lp of each tr on hook, 2 tr in back loop of next sc, yo, draw through all 3 lps on hook; rep from * 6 times, ch 4, join with sl st to first tr. For first Center, finish off and weave in ends.
For second Center, DO NOT FINISH OFF.
Rnd 3: (Second Center only)With right sides of Centers facing (wrong sides together), working through both thicknesses, work 7 sc in each ch-4 sp around; join. Finish off and weave in ends.
Rings (Make 8)
Attach yarn to plastic ring, ch 1, 32 sc in ring; join with sl st to first sc. Finish off leaving long end.
- Using long end, sew each Ring by 2 sc between 2 sps on Center. Repeat for all Rings.
- Sew 8 Rings together where they touch.
BORDER
Rnd 1:With right side facing, join with sl st to 7th free sc on one Ring, sc in next 6 sc, * ch 8, sc in center 6 sc on next Ring; rep from * around; join.
Rnd 2:Ch 1, sc at base of same sc, sc at base of next 5 sc, * 10 sc in next sp, sc at base of next 6 sc; rep from * around; join.
Rnd 3:Ch 1, sc at base of same sc, (sc at base of next sc) around; join with sl st to back loop of first sc. DO NOT FINISH OFF.
HANDLE
Rnd 1:Ch 1, sc in same sc, sc in back lp of next 5 sc, turn, sc in remaining lp of same 6 sc. DO NOT JOIN. MARK BEG OF EACH ROUND.
Rnds 2-3:Working in back loops only, sc in each sc around.
Rnd 4:Working in back loops only, (2 sc in first sc, sc in next 5 sc) twice.
Rnds 5-7:Sc in each sc around.
Rnds 8-15:Rep Rnds 4-7 twice.
At the end of Rnd 15, ending on right side, sl st in next sc, slip a plastic ring in end of Handle, work 28 sc in ring, sl st in other side of Handle. Finish off leaving long end.
- Using long end, sew 2 halves of end of Handle together over bottom of ring.
Handle Edging
Row 1:With right side facing, join with sl st to first sc to left of Handle, * ch 5, sl st in 2nd ch from hook, sc in next ch, hdc in next ch, keeping last lp of each dc on hook, 2 dc in next ch, yo and draw through all 3 lps on hook, skip next 3 sc, sl st in next sc; rep from * around to other side of Handle. Finish off and weave in ends.
- Starch, pin right-side-up in true shape, press flat through a cloth and leave until dry.
All Rights Reserved ©2015 Maggie Weldon
We have made every effort to make sure the instructions are accurate & complete. We cannot however be responsible for human error, variations in individual work or typographical mistakes.
No part of our publications or websites may be reproduced or distributed by any means, including but not limited to: screen shots, photocopies, photographs, tracings, scans, uploads, emails, recording of instructions by word of mouth through storage and retrieval systems, without the express written consent of the publisher.