


Suede Poncho Free Pattern
Click the banners below for more popular patterns, available via mail or download!


Suede Poncho
FP156
Intermediate Skill
Original Design By: Maggie Weldon
Size: One size fits most adults - 31" long in center and 60" around shoulders
Materials: Bulky Weight Yarn
Mocha (MC) – 11 ¼ oz, 458 yds (320 grams, 366 meters)
Ecru (CC) – 2 oz, 82 yds (56 grams, 66 meters)
Yarn Needle
Model made with Lion Brand® Lion Suede
Crochet Hook: Size J-10 (6 mm) or size needed to obtain gauge.
Gauge: One motif = 5 ¾" square
Abbreviations
|
ch |
chain |
sc |
single crochet(s) |
|
dc |
double crochet |
sl st(es) |
slip stitch(es) |
|
hdc |
half double crochet |
st(s) |
stitch(es) |
|
rep |
repeat |
tr |
treble crochet |
|
rnd |
round |
yo |
yarn over |
Special Stitches
Picot: Ch 4, sl st in 4th ch from hook.
JOINING WITH SC
When instructed to join with sc, begin with sl knot on hook, insert hook in st or sp indicated, yo and pull up a loop, yo and draw through both loops on hook.
Directions
First Motif
Rnd 1(right side): With MC, ch 6, sl st in first ch to form ring, ch 3 (counts as dc), dc in ring, picot, (2 dc in ring, picot) 7 times; join with sl st to first dc. Finish off. (8 picots and 16 dc)
Rnd 2:With right side facing, join CC with a sl st in space between 2 dc between any 2 picots, ch 6 (counts as hdc, ch 4), ©skip next picot, hdc in sp between next 2 dc ©, ch 5, * rep ©to ©once, ch 4, rep ©to ©once, ch 5, rep from * twice more; join with a sl st to first hdc. (8 ch-4 sps and 8 hdc) Finish off.
Rnd 3:With right side facing, join MC with a sc in any ch-5 space, (3 dc, ch 3, 3 dc, sc, sl st) in same sp, ©(sc, 2 dc, ch 1, 2 dc, sc, sl st)in next ch-4 sp (shell made) ©, * (sc, 3 dc, ch 3, 3 dc, sc, sl st) in next ch-5 sp, rep ©to ©once, rep from * twice more; join with sl st to first sc. Finish off. (8 shells)
Additional Motifs (Make 29)
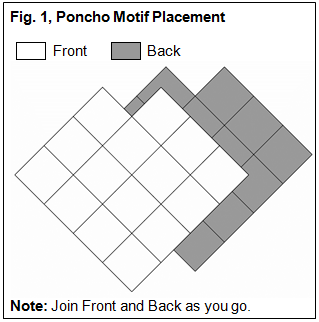
Rnd 3 (Joining rnd): Referring to Placement Diagram (Fig. 1), work One, Two or Three Side Joining as follows.
One Side Joining
Rnd 3: With right side facing, join MC with a sc in any ch-5 space, * 3 dc in same sp, holding Motifs with wrong sides facing, ch 1, sl st in center ch of adjacent Motif, ch 1, (3 dc, sc, sl st) in same ch-5 sp of new Motif *, (sc, 2 dc) in next ch-4 sp, sl st in ch-1 sp of adjacent Motif, (2 dc, sc, sl st) in same ch-4 sp of new Motif, sc in next ch-5 sp, rep * to *once, ©(sc, 2 dc, ch 1, 2 dc, sc, sl st)in next ch-4 sp ©, ** (sc, 3 dc, ch 3, 3 dc, sc, sl st) in next ch-5 sp, rep ©to ©once, rep from ** once more; join with sl st to first sc. Finish off. (8 shells)
Two Side Joining
Rnd 3: With right side facing, join MC with a sc in any ch-5 space, * 3 dc in same sp, holding Motifs with wrong sides facing, ch 1, sl st in center ch of adjacent Motif, ch 1, (3 dc, sc, sl st) in same ch-5 sp of new Motif *, (sc, 2 dc) in next ch-4 sp, sl st in ch-1 sp of adjacent Motif, (2 dc, sc, sl st) in same ch-4 sp of new Motif, sc in next ch-5 sp, rep from first * once more, rep * to * once, ©(sc, 2 dc, ch 1, 2 dc, sc, sl st)in next ch-4 sp ©, (sc, 3 dc, ch 3, 3 dc, sc, sl st) in next ch-5 sp, rep ©to ©once; join with sl st to first sc. Finish off. (8 shells)
Three Side Joining
Rnd 3: With right side facing, join MC with a sc in any ch-5 space, * 3 dc in same sp, holding Motifs with wrong sides facing, ch 1, sl st in center ch of adjacent Motif, ch 1, (3 dc, sc, sl st) in same ch-5 sp of new Motif *, (sc, 2 dc) in next ch-4 sp, sl st in ch-1 sp of adjacent Motif, (2 dc, sc, sl st) in same ch-4 sp of new Motif, sc in next ch-5 sp, rep from first * twice more, rep * to * once, (sc, 2 dc, ch 1, 2 dc, sc, sl st)in next ch-4 sp; join with sl st to first sc. Finish off. (8 shells)
Finishing
Weave in ends.
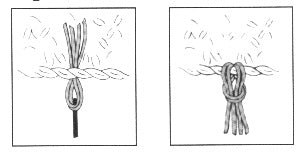
Fringe
Cut a piece of cardboard 3" wide x 6" long. Wind MC loosely around the cardboard lengthwise until full. Cut across one end. Repeat as needed.
Hold together 3 strands of MC; fold in half. Working along edges of Poncho, with right side of Poncho facing and using a crochet hook, draw the folded end up through ch-1 sp of any shell and pull the loose ends and yarn tails through the folded end; draw the knot up tightly. Using picture as a guide, repeat for fringes in ch sps of shells, and spaces between Motifs. Lay flat on hard surface and trim ends.
All Rights Reserved ©2015 Maggie Weldon
We have made every effort to make sure the instructions are accurate & complete. We cannot however be responsible for human error, variations in individual work or typographical mistakes.
No part of our publications or websites may be reproduced or distributed by any means, including but not limited to: screen shots, photocopies, photographs, tracings, scans, uploads, emails, recording of instructions by word of mouth through storage and retrieval systems, without the express written consent of the publisher.