


Hexagon Flower Motif Doily Free Pattern
Click the banners below for more popular patterns, available via download!

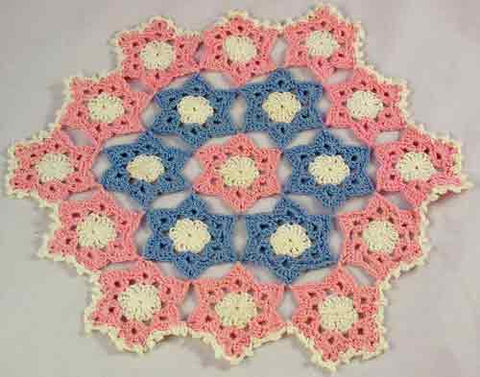
Hexagon Flower Motif Doily
FP216
Easy Skill
Original Design By: Maggie Weldon
Size: 12" diameter
Materials:Size 10 Crochet Thread:
White (W) - 100 yd
Pink (P) - 100 yd
Light Blue (B) - 50 yd
J&P Coats Knit-Cro-Sheen used in model.
Crochet Hook: Steel size 7 (1.65 mm)
Additional Materials:Thread Needle;
For Finishing:
Spray Starch
Non-Rust pins
15" piece of cardboard
Plastic Wrap
Abbreviations
|
beg |
beginning |
rnd |
round |
|
ch |
chain |
sc |
single crochet |
|
dc |
double crochet |
sl st(s) |
slip stitch(es) |
|
hdc |
half double crochet |
sp(s) |
space(s) |
|
lp(s) |
loop(s) |
st(s) |
stitch(es) |
|
rem |
remaining |
tr |
treble crochet |
|
rep |
repeat |
yo |
yarn over |
Special Stitches
Picot:Ch 3, sl st in sc just worked.
MOTIF # 1 (Pink)
Rnd 1:(Right Side) Starting at center, with W, ch 4, sl st in first ch to form ring; ch 4 (counts as first tr), 17 tr in ring; join with sl st to first tr. Finish off. (18tr)
Rnd 2:With right side facing, join color thread with sl st to any tr of Rnd 1, ch 3 (counts as first dc now and throughout), (dc, ch 3, 2 dc) in same tr, ch 1, skip 2 tr, * (2 dc, ch 3, 2 dc) in next tr, skip 2 tr, ch 1; rep from * around; join with sl st to first dc. Do not turn. (6 Shells)
Rnd 3:Sl st in next dc and ch-3 sp, ch 3, (3 dc, ch 3, 4 dc) in same sp, sc in next ch-1 sp, * (4 dc, ch 3, 4 dc) in next ch-3 sp, sc in next ch-1 sp; rep from * around; join with sl st to first dc. Finish off. (6 points)
REMAINING MOTIFS (6 Blue, 12 Pink)
Rnds 1-2:Rep Rnds 1-2 of Motif # 1.
Rnd 3:Using Placement Diagram as a guide, work One, Two or Three Side Joining for Rnd 3.
One Side Joining
Rnd 3:(Joining Round) Sl st in next dc and ch-3 sp, ch 3 (counts as first dc) , (3 dc, ch 3, 4 dc) in same sp, sc in next ch-1 sp, [(4 dc, ch 3, 4 dc) in next ch-3 sp, sc in next ch-1 sp] 3 times, * (4 dc, ch 1) in next ch-3 sp, with right sides facing (wrong sides together, matching shaping), working on Motif # 1, sl st in center ch of next ch-3, ch 1, working on Current Motif; 4 dc in same ch-3 sp last worked, sc in next ch-1 sp, rep from * once more; join with sl st to first dc. Finish off. (6 points)
Two Side Joining
Rnd 3:(Joining Round) Sl st in next dc and ch-3 sp, ch 3 (counts as first dc) , (3 dc, ch 3, 4 dc) in same sp, sc in next ch-1 sp, [(4 dc, ch 3, 4 dc) in next ch-3 sp, sc in next ch-1 sp] twice, * (4 dc, ch 1) in next ch-3 sp, working on Base Motif, with right side facing (wrong sides together, matching shaping); sl st in center ch of next ch-3, ch 1, working on Current Motif; 4 dc in same ch-3 sp last worked, sc in next ch-1 sp, rep from * once more, (4 dc, ch 1) in next ch-3 sp, working on Previous Motif, sl st in center ch of next ch-3, ch 1, working on Current Motif; 4 dc in same ch-3 sp last worked, sc in next ch-1 sp; join with sl st to first dc. Finish off. (6 points)
Three Side Joining
Rnd 3:(Joining Round) Sl st in next dc and ch-3 sp, ch 3 (counts as first dc) , (3 dc, ch 3, 4 dc) in same sp, sc in next ch-1 sp, * (4 dc, ch 1) in next ch-3 sp, working on 'first' Motif, with right side facing (wrong sides together, matching shaping); sl st in center ch of next ch-3, ch 1, working on Current Motif; 4 dc in same ch-3 sp last worked, sc in next ch-1 sp, rep from * once more, (4 dc, ch 1) in next ch-3 sp, working in join between two points; sl st in center ch of next ch-3, ch 1, working on Current Motif; 4 dc in same ch-3 sp last worked, sc in next ch-1 sp, ** (4 dc, ch 1) in next ch-3 sp, working on previous Motif, sl st in center ch of next ch-3, ch 1, working on Current Motif; 4 dc in same ch-3 sp last worked, sc in next ch-1 sp, rep from ** once more; join with sl st to first dc. Finish off. (6 points)
Continue as established for joining of remaining motifs.
BORDER
Rnd 1:With right side facing, join W in the space between any two motifs, ch 1, sc in the same sp, * picot, ch 3, sc in space between 2nd and 3rd dc of next 4-dc group, picot, ch 3, sc in next sc, picot, ch 3, sc in space between 2nd and 3rd dc of next 4-dc group, picot, ch 3, sc in next ch-3 sp, picot, ch 3, sc in space between 2nd and 3rd dc of next 4-dc group, picot, ch 3, sc in next sc, picot, ch 3, sc in space between 2nd and 3rd dc of next 4-dc group, picot, ch 3, picot, ch 3, sc in space between joining of next 2 motifs; rep from * around omitting last sc; join with sl st to first sc. Finish off and weave in all ends.
FINISHING- use photo as guide
Draw a 12" circle (or the size of the finished doily) on the piece of cardboard. Wrap the plastic over circle. Position and pin Doily in place over plastic with non-rust pins. Spray with starch. Allow to dry completely.
All Rights Reserved ©2015 Maggie Weldon
We have made every effort to make sure the instructions are accurate & complete. We cannot however be responsible for human error, variations in individual work or typographical mistakes.
No part of our publications or websites may be reproduced or distributed by any means, including but not limited to: screen shots, photocopies, photographs, tracings, scans, uploads, emails, recording of instructions by word of mouth through storage and retrieval systems, without the express written consent of the publisher.