


Christmas Chalkboard - Free Crochet Pattern
Click banners to purchase these Maggie's Crochet Patterns! Free Pattern is below.


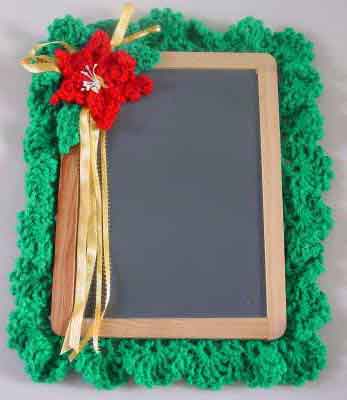
CHRISTMAS CHALKBOARD
Easy Skill
Materials
- Craft or Hot Glue; 6 Pearl Stamens;
- 2 strands Gold Ribbon (36" length of each, 1/4" wide and ½" wide);
- Chalkboard (11 ½" x 8 ½");
- Yarn Needle; Worsted Weight Yarn;
- Green (G) 3 oz, 165 yd (84 g, 149 m); Small amounts of Red (R) and Yellow (Y).
Crochet Hook: Size I-9(5.50 mm) or size needed to obtain gauge.
Gauge: Rnd 1should be slightly smaller than the outer edge of your chalkboard.
Abbreviations
beg - beginning
ch - chain
dc - double crochet
hdc - half double crochet
lp - loop
rem - remaining
rep - repeat
rnd - round
sc - single crochet
sl st - slip stitch
sp - space
st - stitch
tr - treble crochet
yo - yarn over
When instructed to join with sc, begin with sl knot on hook, insert hook in st or sp indicated, yo and pull up a loop, yo and draw through both loops on hook.
Special Stitches
Rnd 1: With G, ch 110, being careful not to twist chain, sl st in first ch to form ring; ch 3 (counts as first dc now and throughout), (dc, ch 2, 2 dc) in same ch as joining, * dc in next 22 ch, (2 dc, ch 2, 2 dc) in next ch, dc in next 31 ch *, (2 dc, ch 2, 2 dc) in next ch; rep from * to * once more; join with sl st to first dc. (122 dc)
Rnd 2: Sl st in next 2 dc and next corner ch-2 sp, ch 5 (counts as dc, ch 2), (dc, ch 2, v-st) in same ch-2 sp, ** ch 1, skip next 2 dc, * v-st in next dc, ch 1, skip next 2 dc; rep from * across, (v-st, ch 2, v-st) in corner ch-2 sp, rep from ** around, end; ch 1, skip next 2 dc, (v-st in next dc, ch 1, skip next 2 dc) across to next corner; join with sl st to first dc. (46 V-sts)
Rnd 3: Sl st in next ch-2 sp, ch 1, sc in same sp, [(dc, picot) 6 times, dc] in next ch-2 sp, * sc in next ch-2 sp, [(dc, picot) 6 times, dc] in next ch-2 sp; rep from * around; join with sl st to first sc. (25 shells) Finish off and weave in ends.
PoinsettiaRnd 1 (Right Side): With Y, ch 2, 6 sc in 2nd ch from hook; join with sl st in first sc. (6 sc) Finish off.
Petals
First Petal
Row 1: With right side facing, join R with sl st to any sc, * ch 1, 2 sc in same sc, 2 sc in next sc. (4 sc) CH 1, TURN EACH ROW
Row 2:2 sc in first sc, sc in next 2 sc, 2 sc in last sc. (6 sc)
Row 3:Sc in each sc across.
Rows 4-8:Sc in each sc across to last, leave last sc unworked.
At end of Row 8 there will be 1 sc. Do not finish off.
Petals 2-6
Ch 1, turn, working in ends of rows, sl st along side of Petal, sl st in last sc worked of Ponsettia Rnd 1, sl st in next sc; rep from * of Petal Row 1 for remaining petals.
After 6 petals are completed, finish off and weave in all ends.
Hollies
(Make 2)
Row 1: With G, ch 2, 4 sc in 2nd ch from hook. (4 sc) CH 1, TURN EACH ROW.
Rows 2-8:Work as for Rows 2-8 of Poinsettia Petals. At the end of Row 8, finish off and weave in ends.
Finishing
USE PHOTO AS A GUIDE
- Glue right side of Ruffle to back edge of Chalkboard.
- Holding 2 strands of Ribbon together at the same time, tie a 6-inch bow. Glue bow to top corner of board.
- Glue Pearls to center of Poinsettia.
- Glue Poinsettia over center of bow.
- Glue Hollies at sides of Poinsettia.