


Coin Dots Place Mats Free Pattern
Click banners to purchase these Maggie's Crochet Patterns! Free Pattern is below.


Coin Dots Placemats
Edited by Maggie Weldon
Easy Skill
Size: About 18 inches by 12 inches.
Materials
Size 30 Mercerized Crochet Cotton:
Yellow, Light Pink and Light Blue (750 yds each);
Six-Strand Embroidery Floss:
Oriental Blue - 5 skeins,
Pink, Brilliant Green, Light Lavender, Flame, Chartreuse, Rose, Spring Green, Deep Yellow, Steel Blue, Amethyst, Pea Green, Orange - ½ skein each.
Crochet Hook
Steel No. 5 (1.90 mm) and No. 7 (1.65 mm)
Abbreviations
|
ch |
chain |
rnd |
round |
|
dc |
double crochet |
sc |
single crochet(s) |
|
hdc |
half double crochet |
sl st(s) |
slip stitch(es) |
|
lp(s) |
loop(s) |
sp(s) |
space(s) |
|
rem |
remaining |
st(s) |
stitch(es) |
|
rep |
repeat |
yo |
yarn over |
FOUNDATION MAT
Row 1:(Right Side) Starting at short edge, using 1 strand of each Size 30 color and No. 5 hook, make 15-inch tight chain; sc in 2nd ch from hook, (ch 1, skip next ch, sc in next ch) across for 11½ inches. Cut and rip excess chain.
Row 2:Ch 1, turn, sc in first sc, (ch 1, sc in next sc) across.
Repeat Row 2 for 17½ inches. DO NOT FINISH OFF.
Edging
Rnd 1:Ch 1, turn, 3 sc in first sc, * (sc in next ch-1 sp, sc in next sc, sc in next sp, skip next sc) across; 3 sc in corner, (2 sc in next 2-row rib, sc in next rib) across, 3 sc in corner; repeat from *; join with sl st to first sc. Finish off and weave in ends.
BORDER
Rnd 1:With right side facing, using Oriental Blue Floss and No. 7 hook, join to 2nd sc to right of center sc at 1 corner, (skip next sc, 5 dc in next sc, skip next sc, sc in next sc) around, having a shell at each corner; join. Finish off and weave in ends.
COIN DOTS
(Make 13 - 1 of each Floss color)
Rnd 1:Starting at center, using Floss and No. 7 hook, ch 2, 6 sc in 2nd ch from hook. (6 sc) DO NOT JOIN. MARK END OF EACH ROUND.
Rnd 2:(2 sc in each sc) around.
Rnd 3:(Sc in next sc, 2 sc in next sc) 7 times.
Rnd 4:(Sc in next 2 sc, 2 sc in next sc) 7 times.
Rnd 5:(Sc in next 3 sc, 2 sc in next sc) 8 times.
Rnd 6:(Sc in next 4 sc, 2 sc in next sc) 3 times, sc in next 4 sc, sl st in next 2 sc. Finish off leaving long end for sewing.
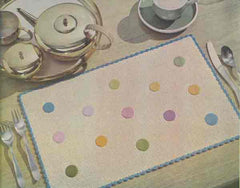
Using photo as a guide:
- Sew first Dot wrong-side-up 2¾ inches from left end and from top edge.- Sew 2 more Dots across end.
- Sew 4 more rows of Dots, evenly spaced.
- Stretch and pin Mat right-side-down in true shape. Steam and press dry through a cloth.
All Rights Reserved ©2015 Maggie Weldon
We have made every effort to make sure the instructions are accurate & complete. We cannot however be responsible for human error, variations in individual work or typographical mistakes.
No part of our publications or websites may be reproduced or distributed by any means, including but not limited to: screen shots, photocopies, photographs, tracings, scans, uploads, emails, recording of instructions by word of mouth through storage and retrieval systems, without the express written consent of the publisher.